

If you’ve ever hauled a pack of bottled water into your home, you’ve likely wondered if all that effort (and expense) could be avoided. Not to mention the recycling bin full of empty plastic bottles that seems to overflow every week, or the uneasy feeling from reading about microplastics leaching into what’s supposed to be clean water. Looking for an easier, smarter, and more environmentally sound way to guarantee pure drinking water? There’s a compelling case for bringing an ultraviolet (UV) reverse osmosis (RO) system into your kitchen—especially the feature-packed Express Water Ultraviolet RO System.
Let’s take a closer look at why many are making the switch and exactly how to bring this professional-grade technology right to your sink, transforming how your household gets its water, and leaving bottled water far behind.
Bottled Water: The Wastefulness and Irritations
Before exploring new options, it’s helpful to evaluate the most pertinent issues of sticking with bottled water:
- High recurring costs: For a household, paying for bottled water can escalate to hundreds or even thousands in a year, especially if it is the household’s main drinking water.
- Environmental impact: The production of bottled water, along with its distribution, requires a considerable amount of energy and water. The production of bottled water adds to the already existing problem of plastic pollution which is an eyesore to the land and the oceans.
- Storage and convenience: The availability and gathering of drinking water is more of a problem. The constant refilling, the storing, and the dragging of heavy cases is not a form of convenience.
- Quality uncertainty: The perception of water purity in bottled water is common, but in reality, some bottled water companies have restricted quality standards which allows them to use lower quality water.
Considering these issues, more and more households are looking for something straightforward, gentler on the environment, and most importantly, entirely in their control.
Making the Switch: Why UV Reverse Osmosis Stands Out
Think about having the ability to dispense water directly from your kitchen sink and have it be fresh and purified on the spot—absolutely flawless and bacteria free. The Express Water Ultraviolet RO System brings together the most sophisticated techniques of water purification in one unit.
- Multi-stage filtration: eliminates sediments, chemicals, heavy metals and organic toxins.
- Reverse osmosis membrane: removes dissolved solids, nitrates, fluoride, and several other contaminants, even those not visible to the eye, at a high percentage.
- Ultraviolet sterilization: removes 99.99% of bacteria and viruses for safe drinking water.
- Modern chrome faucet: serves purified water in a contemporary stylish chrome faucet.
This system doesn’t just compete with bottled water—it raises the stakes for what you expect in your glass.
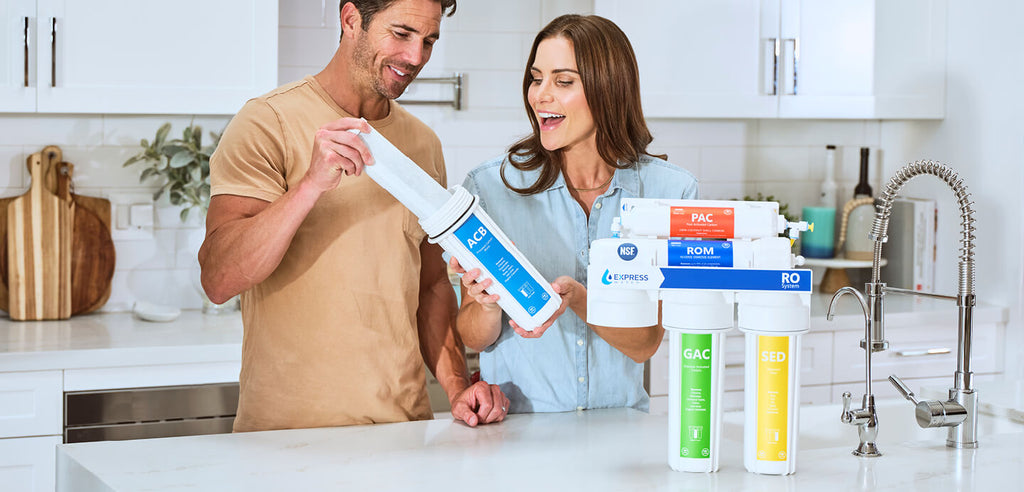
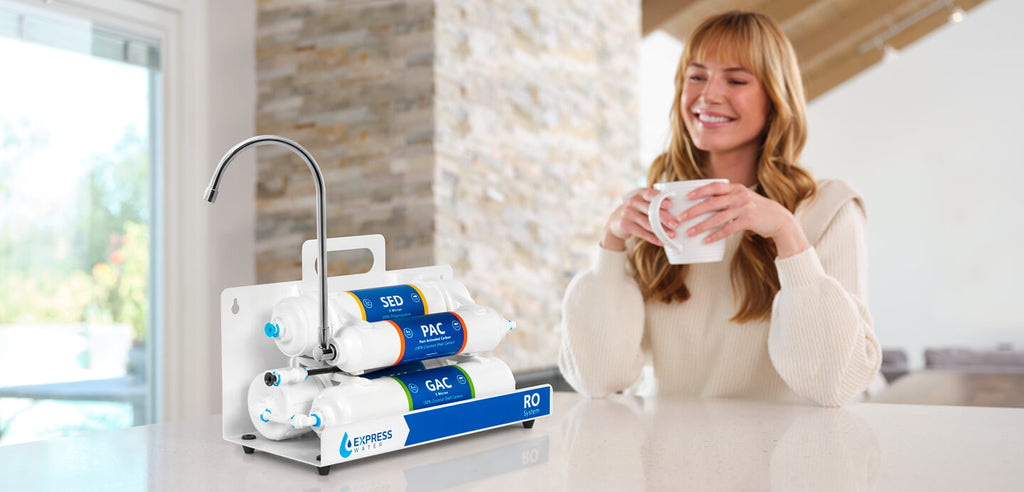
Meet the Express Water Ultraviolet RO System
Before beginning installation, get familiar with what’s included in the Express Water UV RO kit. Each part serves a vital role:
|
Component |
Function |
| Sediment Filter |
Captures rust, dirt, and silt |
| Carbon Block Filter |
Reduces chlorine, taste, and odor |
| Granular Activated Carbon |
Absorbs organic chemicals, pesticides, and VOCs |
| RO Membrane |
Removes dissolved solids, heavy metals, and many poisons |
| UV Sterilizer Chamber |
Destroys bacteria, viruses, and microbes with UV light |
| Post-Carbon Filter |
Polishes the water, enhancing purity and flavor |
| Storage Tank |
Stores filtered water, pressurized for instant delivery |
| Chrome Faucet |
Provides direct access at your sink |
| Tubing & Quick-Connects |
Ensures leak-free, tool-free installation |
| Feed Valve & Drain Saddle |
Links the system to your existing plumbing |
Every filter and chamber is sized and color-coded for straightforward setup, designed to make the whole process as smooth for homeowners as possible.
Step-by-Step Installation: Pure Water on Tap
Let’s go over putting together the Express Water UV RO System in a standard kitchen. Prepare to spend some time on this “project” as it requires some tools: an adjustable wrench, a screwdriver, and a drill for the faucet hole if one is not present. Remember to have a towel on standby to soak up the water that drips as you access the cold water line.
Pro-tip: Many Express Water kits now come with video guides and Color instruction manuals. Having a smartphone or tablet book nearby can be handy with on-the-go references.
1. Prep the Under Sink Area
Clear the area underneath the sink and shut off the cold water supply valve. To release any built-up pressure, open the faucet. Put a small tray or cloth to catch any minor drips that escape.
2. Mount the Filter Assembly
The main filtration unit comes pre-assembled, with filters snapped into labeled housings. Select a sturdy spot against the cabinet wall and use the included mounting bracket. Ensure at least 8–10 inches of clearance beneath the filters for future replacements.
Visual cue: The three canisters from left to right should match the sediment filter (white), carbon block (black), and granular activated carbon (blocky, brownish gray). Clear labeling is present on each housing to avoid confusion.
3. Install the Storage Tank
Set the white, pressurized tank upright within the available cabinet space. Carefully seal the tank shut-off valve. For threaded connections, Teflon tape can be used to provide extra leak assurance.
4. Connecting the Faucet
If your sink has a side sprayer or a soap dispenser, you can easily remove it and put it to better use. If not, use the supplied template to trace and drill a ½” through the countertop.
Unscrew the lock washer and hardware, set the faucet in place, and secure everything hand-tight. The faucet tubing is color-coded—usually blue for filtered water—making the connection process simple.
Visual cue: A gleaming, modern chrome faucet sits neatly above your sink, ready to deliver fresh, purified water.
5. Tap into Your Cold Water Line
Next, install the feed water adapter between your cold water shutoff valve and faucet supply hose. This enables a discreet, non-invasive connection to your plumbing. Attach the white tubing to the adapter and route it to your filtration system’s inlet marked “IN.”
Express Water’s quick-connect fittings eliminate the need for wrenches or fancy tools. Insert the tubing until it clicks—done.
6. Install the Drain Saddle
Look for the drain pipe underneath your kitchen sink, usually it is 1.5" or 2" PVC or metal pipe. Using the included template and safely drill a small hole. Securely tighten the drain saddle onto the pipe and align the hole. Insert the black tubing from your RO system's waste output.
This is a critical step to make sure the waste water is diverted into your plumbing waste line.
7. Connect the Storage Tank
Attach the yellow or white tank tubing to the system’s port labeled “TANK.” Again, a push into the quick-connect fitting should lock everything securely.
8. Install the UV Sterilizer Filter
Position the stainless steel UV chamber horizontally. Connect the water input from the post-carbon filter and connect the final output tubing toward the faucet.
Install the included ultraviolet lamp into its quartz sleeve inside the chamber. Plug the power adapter into a standard electrical outlet. An LED indicator will glow, signaling the UV system is operational.
9. Final Checks and Initial Flush
Inspect each tubing connection for security. Open your cold water supply, then slowly turn on the storage tank valve and faucet.
Let the water run for a minimum of 10–15 minutes, flushing any air, loose carbon, and pre-filtered residues. Some initial cloudiness or tiny air bubbles are common and harmless. Once clear, the system is ready for everyday use.
10. Verify Operation and Finish Setup
Watch for any leaks at fittings and retighten if needed. Taste a sample from your new faucet—the difference is immediate: no plastic aftertaste, just crisp, sterilized water.
Installation Checklist:
- All filter housings correctly seated and tightened
- Tank valve and faucet lines properly connected
- Feed valve and drain saddle secure with no leaks
- UV light plugged in and indicator showing operation
- Water flushed until running clear
Daily Benefits of Your UV RO System
Switching to a UV-enhanced RO system is more than a project—it’s a new way to look at water quality, convenience, and sustainability. Here’s what stands out after the system is up and running:
- Consistent purity: Multiple barriers remove particles, chemicals, and even living pathogens, far exceeding typical home pitcher filters.
- No more plastics: Turn on the faucet and fill glasses, bottles, pots, and coffee machines while barely adding to household waste.
- Peace of mind: The UV chamber acts as a safety net, neutralizing waterborne bacteria and viruses.
- Cost savings: Annual costs for filter changes are a fraction of what you’d spend on bottles—often less than $100 per year for a family.
- Style and convenience: The system’s high-flow chrome faucet adds a modern touch and instant access to premium water.
A quick look at how your kitchen routine changes tells the whole story:
|
Old Habit |
With Express Water UV RO System |
| Buying and storing bottles |
Turn on your new faucet |
| Carbon Block Filter |
Reduces chlorine, taste, and odor |
| Weekly recycling runs |
Minimal plastic waste |
| Doubts about tap water |
Laboratory-grade confidence |
By making this switch, you don’t just save money or help the environment. You take charge of what’s in your water—and that’s real peace of mind every time you fill your glass.


Leave a comment